Okay guys so I say this really cute cape on the The Pineneedle-collective and it was super adorable!!!!!!! I know it's summer in Texas but who gives a hoot I decided I was going to make me one of these adorable things!!!! So here goes!!! I am going to have to complete half of this project at work and the other half at home..because thats where my machine is lol I couldn't bring it to work:(. I work at a school during the summer and they love it when I bring projects to work and make new things so I have their total support lol!!! They can't wait to see how this puppy turns out!!!
This is my inspiration here!!!! This is Miss. Annika from PineNeedle Collective!!! And her cape is adorable!!! Buuuuut she never had time to put up a tutorial:( soo since she couldn't and I'm making this very same cape I figured I would include some instructions!!!! yay me lol!
And just in case you could't see how awesome it is....here's a close-up!!!!!
SO CUTE!!!
SO LETS GET STARTED!!!
Supplies:
- Old Jacket (Tweed, Corduroy, im not biased so anything you think may work for you!!!)
- Pins
- Scissors
- Needle and Thread
- Buttons (if you need to add extra)
- Sewing Machine (maybe you could sew by hand if your ssssuppper determined but I really don't know how well that would work...and your hands may fall off depending on how many layers and what kind of material you have to sew through).
- Patience!!!
Disclaimer:
There will be many pictures! You may not need to see all of them to understand the tutorial so feel free to skip them and look at the pictures you need! Don't forget to comment and subscribe/follow and show me those capes if you make them!!!
This here is my jacket! It's Tweed and I happened to come across it at my favorite Thrift Store! It was only 25 cents and on top of that I have a whooping total of 45 blazers so I figured why not try something new that I'm not scared to ruin lol!! Btw I am at work which is why I couldn't model the jacket and spin and twirl in it lol, so alas on this table it sits!
The next part is pretty simple: seam rip the actual tweed on the outside of the lining but be careful not to put any holes in it!!! Tweed unravels:( this may take a little time but not tooo long.
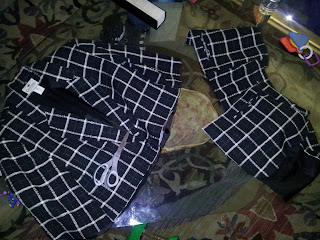
- After you are done ripping you will have some thing that looks like this! The back half of the body is slightly under the front left piece of the body, the front right piece of the body is located at the top right corner, and the sleeve is located between them at the bottom right corner! And I left the left side of the jacket intact so that you could get a pretty good picture of what the blazer went through!
- You will need to attach the two body pieces to each side of the split open sleeve (again located in the middle) its super simple!
And its going to look a little something like this!!! With the shoulder being located above the pinning!
A quick tip: make sure that if your jacket has a lining that you line it up as best you can with the outside pieces so that is is not all bunched up on the inside.
I only did one side first. So this is the right-side repinned and right-side out!
And this is both sides completed (it's not completely flat, like I said I am doing half of this project at work lol)! It's looking very capey no???!!!
And this is a close-up (pre-sewn) of the outside sleeve attatched to the body!
so please excuse the lighting situation because it does suck lol!!!)
so on to the next step!!! Cutting the cape!
When I cut my cape I tried it on first of course. And marked it where my elbow are with white chalk. I then proceeded to cute about 2 to 3 inches below that mark (not certain) and began cutting from there.
And here is my cape cut!!!
(also you can see a little in the background some childrens toys, they are my 1 year old nephews, he leaves his things everywhere like he owns the place lol)
At this point you will need to hem the bottom of your cape, I hemmed mine 1inch and make sure to hem the lining of the jacket with the main fabic too so that it is not seen.
And lastly attatch your buttons of choice and you are finished!!!
Now I have yet to take photos of this D.I.Y because I am trying to find the perfect outfit to go with it but I will update this post as soon as possible with those photos!!!
As always please leave your comments below and if you create the cape please leave a picture!!!


No comments:
Post a Comment